Teacher Appreciation Gifts To Make
Teacher gift to make
|
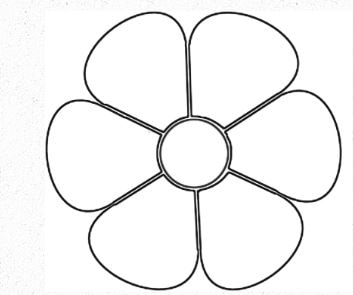
Flower leaf pattern
|
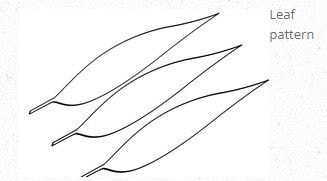
Leaf craft pattern
|
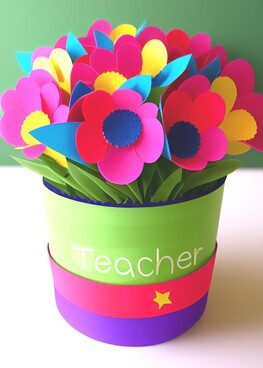
No matter how you make them, these paper daisies are sure to be a hit with any teacher. So why not give them a try for Teacher Appreciation Day?
How to Make Colorful Paper Daisy Flowers with Leaves in a Can Vase
Teacher Appreciation Day is a great time to show your appreciation for the teachers in your life. One fun and easy way to do this is to make them a beautiful bouquet of paper daisies. These flowers are easy to make and can be customized to match any teacher's personality.
Materials:
- Colored paper or felt (in any colors you like)
- Scissors
- A glue stick or tape
- A can (any size)
- A vase
- Instructions:
- Cut out circles of paper or felt in different sizes. The largest circle will be the center of the daisy, and the smaller circles will be the petals.
- Glue or tape the petals together in a spiral, starting with the largest circle and working your way down to the smallest circle.
- Cut out a leaf shape from paper or felt.
- Glue or tape the leaf to the back of the daisy.
- Repeat steps 1-4 to make as many daisies as you like.
- Arrange the daisies in a can or vase.
- Add water to the vase, if desired.
- Tips:
- You can use any color of paper or felt you like to make your daisies.
- If you want to make your daisies more realistic, you can add a stem to each one. To do this, cut a piece of green paper or felt into a long, thin strip. Glue or tape the strip to the back of the daisy, just below the petals.
- You can also add a few leaves to your daisies to make them look even more beautiful.
- Variations:
- You can make your daisies even more special by adding a few details, such as glitter, beads, or buttons.
- You can also make your daisies different sizes and colors to create a more unique bouquet.
- If you don't have any colored paper or felt, you can use construction paper or fabric.